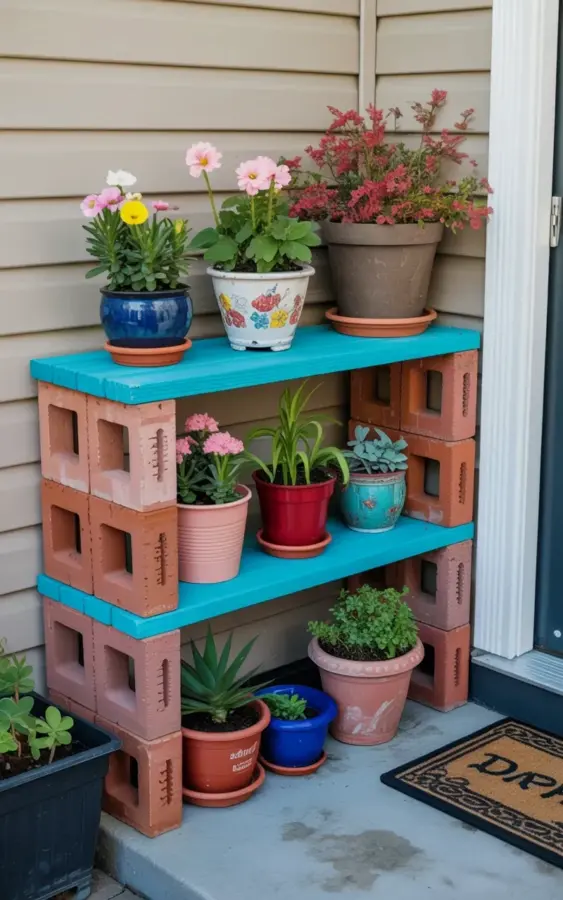
It started with a sad stack of red cinder blocks in my garage, leftovers from a patio project I still haven’t finished (and honestly, might never finish). I was staring at them, then at my sad little collection of potted flowers that were sitting directly on the concrete patio, getting lost in the shuffle. I had maybe twenty bucks in my pocket and a half-used can of turquoise paint in the basement, and I thought, “I can build something better than this.” That moment turned into my favorite budget gardening project yet: a cinder block shelf for outdoor plants that cost me under twenty dollars and completely changed the look of my boring back patio.
Why a Cinder Block Plant Stand Works So Well
Look, you can spend a hundred bucks on a fancy wooden plant stand, but I wanted something that could survive the weather, hold a lot of weight, and still look cute. Cinder blocks are basically the strongest, most weather-proof building material you can find for cheap. They don’t rot, they don’t rust, and if a pot spills, you just wipe it off. Let me tell you, this thing is sturdy. My big ferns and heavy ceramic pots sit on there without a single wobble.
The best part? You don’t need any special tools or skills. You literally just stack blocks like oversized LEGOs and place a painted board on top. My husband thought I was crazy until he saw it holding all our plants, and now he wants one for his workshop. I can’t blame him.
The Simple Materials for This Two-Tier Shelf
Alright, let’s get into the good stuff. Here’s exactly what you need to make your own cinder block plant shelf. You can find all of this at your local hardware store or even on Facebook Marketplace for a steal.
- 8 standard red cinder blocks (the ones with two holes in them)
- 1 piece of wood for the top shelf (I used a leftover shelf board, but a 2×4 works too)
- Spray paint or regular paint for the wood (my turquoise color was a lucky find)
- Sandpaper (just a little bit, to smooth the wood)
- Your favorite potted plants to fill it up (this is the fun part)
The beauty of this project is that you can adjust the sizes. Want a shorter stand? Use fewer blocks per column. Want a longer shelf? Just add more blocks in a row. It’s completely modular, so you can customize it to fit your space perfectly. My patio is on the narrower side, so a two-column design was just right for the spot against my beige vinyl siding wall.
Painting the Top Can Make It Look Expensive
Ok so, the red blocks are nice, but what really makes this cinder block shelf for outdoor plants pop is that painted top. I had this old can of turquoise spray paint that I originally bought for a garden bench, and it sat in my basement for months. One afternoon, I sanded the board down (just to get rid of any rough edges), wiped off the dust, and gave it two solid coats of paint. It took maybe fifteen minutes total, and the color instantly brightened up the whole project.
Now all the red blocks look intentional, kind of like rustic industrial decor, and the turquoise ties it all together. You could also use white, yellow, or even a dark navy if you want something moodier. Honestly, the paint is what pushes this from “scrap material pile” to “cute patio decor”. And here’s a weird little tip, don’t skip lightly sanding the wood first even if it seems smooth. I did once, and the paint peeled right off in the rain.
Step-by-Step Assembly: Stacking the Blocks
There’s really no wrong way to put this together, but I’ll show you what worked for me. Start by laying out your bottom layer on a flat piece of ground. For my shelf, I placed two blocks side by side on the ground, leaving a small gap between them. Then, I placed two more blocks directly on top of those, creating the vertical supports for the first tier.
Place the painted board across the top of those two columns. That’s your middle shelf done. It really is that simple. For the top tier, I just added one more block on top of each column, creating supports for the upper shelf, and then placed a second board across those. However, I actually used the painted board on the top shelf and left the middle shelf with the raw wood, since I wanted the featured tier to be the highest one. Do what makes sense for your plants.
How to Arrange Potted Flowers for the Best Look
Arranging the plants is where things get artistic. On my top shelf, I’ve got a blue ceramic pot bursting with pink and yellow flowers, right next to a white terracotta pot with more pink blooms. The color contrast against the red and turquoise is just perfect. On the bottom tier, I placed five smaller pots, starting with two pink ceramic pots on one end, a red plastic pot, a turquoise pot, and a terracotta pot filling out the rest.
Mix heights and textures. You want some tall, spiky plants and some low, trailing ones. I have a potato vine that spills over the edges, and it softens the hard lines of the blocks. Don’t be afraid to mess with the arrangement either. I swear I rearranged these pots at least four times before I was happy. Nobody has time for perfect symmetry, so just let it look a little wild.
One Pro Tip: The Hidden Drainage Hack
Here’s the thing about using a cinder block shelf for outdoor plants: drainage can be a pain. When you water your plants, the excess water runs out the bottom of the pots and sits on the wood. Not great. I fixed this by placing a few small plastic saucers under the pots on the middle shelf, just to catch the run-off. For the top shelf, I didn’t bother, because the water just drips down onto the concrete patio floor through the gaps between the blocks.
If you’re using real wood, some water stains are pretty much unavoidable. Look, these stands are so cheap to build that you can replace the wood every couple of years if it starts to look rough. Just keep an eye on it after heavy rain, and lean the boards up against the wall to dry if they get soaked. Preventative maintenance, my friends.
It Cost Me Less Than $20, Seriously
Let’s do the math real quick. I paid about $1.50 per cinder block at a local big-box hardware store, which means eight blocks set me back around twelve bucks. The paint was already in my house, so that was free. And the wood was a leftover from an old bookcase I took apart a year ago. If you have to buy everything brand new, you might be looking at twenty-five dollars, but if you scavenge, you can absolutely get this under the $20 mark.
You can’t buy any decent outdoor furniture for that price. Even a basic plastic side table costs more than that. And the best part is, this thing is heavy enough that the wind won’t knock it over, but you can still disassemble it in five minutes if you need to move it across the yard. Try doing that with a solid wood planter box, right? You won’t want to.
Final Thoughts on Your Next Weekend Project
If you’ve been looking for a budget gardening idea that doesn’t look like a construction site, just make this. It’s genuinely the easiest DIY outdoor project I’ve done all year, and it holds so many potted flowers that the whole patio feels alive now. The combination of red blocks, that turquoise painted top, and all the pink, yellow, and red blooms just screams “relaxing summer”.
So grab a few blocks, find some old paint, and give it a shot. You’ll be surprised at how something so simple can make your outdoor space feel so personal. And if you make one? Share a photo with someone who needs a little patio inspiration today, it might just make their whole week.
Leave a Comment