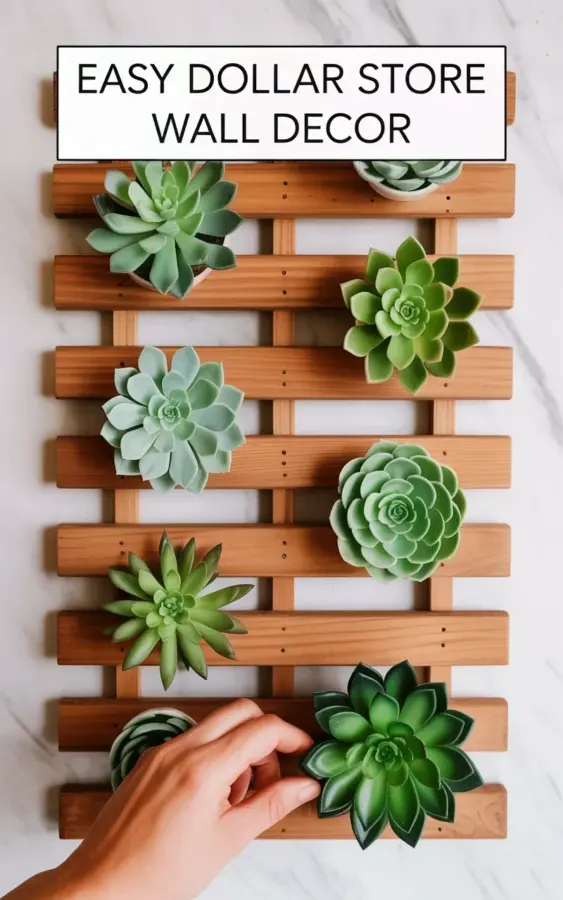
White walls can feel like a blank canvas, but sometimes they need a little texture to wake them up. That is exactly why I built this easy dollar store wall decor for about $12, a project that proves you do not need a big budget to make something visually interesting. In the photo, six artificial succulents, a mix of rosette and star shapes in mint and green, sit between wooden slat tiles arranged in a geometric pattern. The wood grain pops against the white background, and the whole piece took less than an afternoon to put together. This is a true dollarstorediy project, and I am going to show you exactly how to do it with affordable, real options.
Why Wood Slat Tiles Make Great Budget Wall Decor
Wood slat tiles are one of those underrated finds at craft and dollar stores. They are lightweight, inexpensive, and already have a finished look that feels natural and warm. You can find them in packs of four or six, usually in the wood craft section, and they cost a fraction of what a full wooden sign would cost.
What I love about them is their built-in grid. The horizontal slats give you natural gaps to tuck stems into, which means no heavy glue guns or complicated drilling. You can arrange them in a square block, a staggered pattern, or even a diamond shape, all without any special tools. For this project, I used a simple geometric layout with alternating tile directions, which adds depth without making the piece feel busy.
Another reason these tiles work so well is that they hide imperfections. If a succulent stem is a little too long or a bit crooked, the slats cover that mess. You get a clean, polished look even when your hands were not perfectly steady.
What to Buy at the Dollar Store for This Succulent Craft
Before you start, gather your supplies. You want to keep this cheap, so stick to dollar store sections first and only move to bigger craft stores if you cannot find what you need.
- Wooden slat tiles: 4 to 6 tiles, depending on the size you want. Look for ones with even spacing between slats.
- Artificial succulents: 6 total, a mix of rosette shapes and star shapes. Grab both mint and green tones for contrast.
- Hot glue gun and glue sticks: A low-temp glue gun is easier to work with and will not melt the plastic stems.
- Wire cutters or sturdy scissors: To trim the succulent stems down to size.
- Heavy-duty hanging strips or a small sawtooth hanger: For putting the finished piece on the wall.
- Optional: A white paper banner with black text if you want the exact look from the photo. You can print it or write it yourself.
I found everything except the hanging strips at my local dollar store. The succulents were the biggest win, they came in a pack of three for just over a dollar, and they looked surprisingly realistic for that price. Do not overthink the shapes. The rosette succulents look like little flowers, while the star ones add a spiky, sculptural touch. Having both makes the arrangement feel organic.
A Simple Geometric Layout for Your Succulent Tile Decor
The layout is what turns a handful of tiles and fake plants into actual art. Start by laying your wooden slat tiles on a flat surface. In the photo, the tiles are arranged in a geometric pattern, some horizontal, some vertical, which creates a subtle checkerboard effect. You can copy that directly or make it your own.
For a balanced look, place the tiles so their slats run in different directions. This adds visual interest without needing any paint or stain. If you want a more structured design, arrange four tiles in a square. If you want something more modern, stagger them like brickwork. Just make sure the gaps between tiles are even, about a quarter of an inch works well.
Once you are happy with the arrangement, flip the tiles over and glue them together along the seams. Use a strip of masking tape on the front to hold them in place while the glue dries. This step takes two minutes but saves you from trying to position succulents on a wobbly surface.
How to Attach the Artificial Succulents to the Slats
Now comes the fun part, placing the succulents. In the photo, the six plants are positioned between the wooden slats, which means their stems slide right into the natural gaps. That is the easiest method, and it keeps the glue off the visible parts of the leaves.
Start by trimming the stems. Most artificial succulents have a long plastic or wire stem that is meant for floral foam. You want to cut it down to about one inch. Then test the stem in the gap between two slats. It should fit snugly. If it is too loose, add a dab of hot glue to the stem before sliding it in. If it is too tight, trim a little more off the stem or gently widen the gap with a flathead screwdriver.
Place the rosette succulents in the center of each tile or at the intersections of the slats. Put the star shapes near the edges so their spikes can extend beyond the tile boundary. This gives the whole piece a more organic, less boxed-in feel. In the photo, you can see how the succulents are not perfectly uniform, and that is exactly what you want.
Five Easy Ways to Style This Dollar Store Wall Decor
Once your succulent tile art is assembled, the styling possibilities are endless. Here are a few simple ways to make it work in your home without buying anything extra.
- Hang it alone on a narrow wall, like the space between two windows, for a clean focal point.
- Group two or three of these tiles in a row above a sofa or console table.
- Lean it on a shelf or mantel instead of hanging it for a relaxed, casual vibe.
- Pair it with a small wooden sign or a simple framed print that shares the same natural tones.
- Place a small potted plant or a stack of books at the base to anchor the vertical line.
The white banner from the photo is also an easy addition. You can write “Easy dollar store wall decor” by hand on a strip of cardstock, or use your computer to print it. Just attach it to the top tile with a dab of glue, and it instantly looks like a custom piece from a boutique.
How to Keep Your Succulent Wall Art Looking Fresh
The best thing about artificial succulents is that they never need water or sunlight. But they do collect dust, especially in the little crevices between the leaves. A quick clean every few weeks is all it takes to keep the mint and green colors bright.
Use a soft, dry paintbrush or a makeup brush to dust the succulents gently. For the wooden slats, wipe them with a slightly damp cloth. Avoid using spray cleaners directly on the wood, because they can soak into the slats and warp them. If the wood starts to look dull, a light coat of furniture polish brings back the natural shine.
Check the glue joints every once in a while, especially if you live in a humid climate. A tiny dab of hot glue can fix any loose stem before it becomes a problem. With that small bit of care, this budget wall decor will stay looking great for years.
More Dollar Store DIY Ideas for Your Home
If you enjoyed this succulent craft, you will be happy to know there are plenty of other ways to use the same supplies. Wooden slat tiles work beautifully for photo displays, key holders, and small shelf brackets. Leftover artificial succulents can be glued onto picture frames, candle holders, or plain mirrors.
The real trick is to think of the dollar store as a starting point, not a limitation. A few coats of paint, some glue, and a creative arrangement can make anything look intentional. That is the heart of budget decor, taking something common and giving it a purpose you actually love.
This whole project took me less than an hour from start to finish, and the total cost was about $12. No power tools, no special skills, just a little patience and a willingness to try. That is what I love about dollarstorediy projects, they make beautiful things feel possible for everyone.
I hope this gives you the push to try your own version. Grab some slat tiles and a few fake succulents, then see what you can make. When you finish your piece, share a photo with a friend or on your social media, you might just inspire someone else to start their own budget craft afternoon.
Leave a Comment