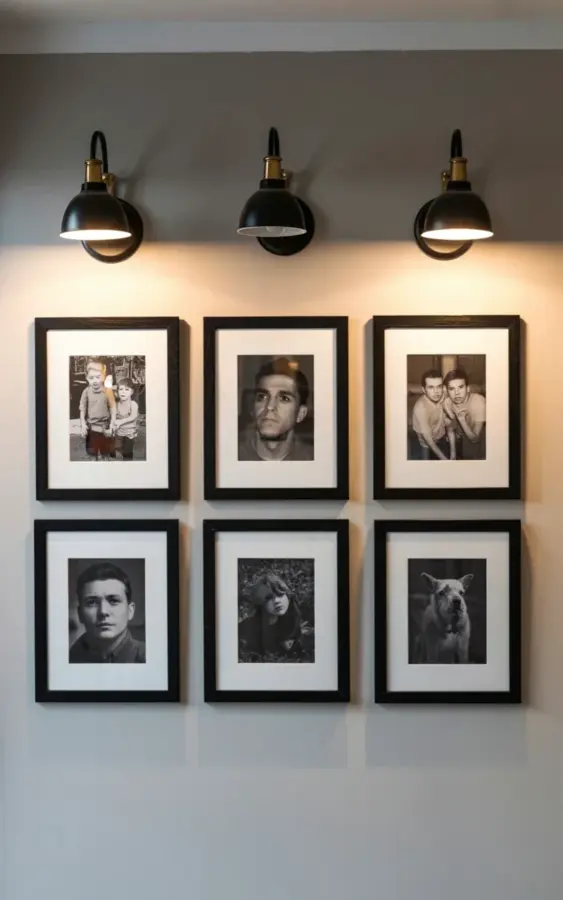
There’s a wall in my hallway that used to look like a blank beige apology. I fixed it for under a hundred bucks with a budget gallery wall, six black and white photos, three sconces, and zero professional help. Honestly, it took me an afternoon and one very frustrating argument with a hammer.
Why black and white photos make a budget gallery wall look expensive
Here’s the thing about color photography: it’s gorgeous, but it fights for attention. Black and white strips all that away. All of a sudden, a grainy shot of your dog and an awkward family photo from 2016 look like they belong in the same collection.
When everything is monochrome, your eye reads the shapes and the light instead of clashing outfits or weird colored walls. That’s why this particular arrangement works so well. The frames are identical, the mats are white, and the photos don’t scream for attention. They just sit there looking quietly intentional, like you planned it for months.
And honestly? You didn’t.
What you actually need: frames, mats, sconces, and a weekend
For this exact look, you need six matching black frames with white matting. I found mine at a big box craft store during a 50% off sale. Each frame cost me around nine bucks. The mats came pre-cut inside the frames, which saved a ton of hassle. You do not need custom framing for this. Do not let anyone convince you otherwise.
Three wall-mounted sconce lights sit above the arrangement. Mine are plug-in sconces with black cords that snake down the wall. I was nervous about the cords showing, but honestly, they’re barely noticeable against a dark wall. If you have a lighter wall and hate cords, there are battery-operated sconce kits now that use rechargeable bulbs. Weirdly, they work really well.
Here’s your complete shopping list:
- Six black frames with white mats (same size, same style, no exceptions)
- Three sconce lights, either plug-in or battery powered
- Prints of your chosen photos in black and white
- Measuring tape, painter’s tape, a level, and the world’s most patient hammer
- Command strips if you rent, or regular picture hooks if you own
Arranging two rows of three without losing your mind
The layout is dead simple: two rows, three across. But the boring part is getting the spacing right. I learned this the hard way after nailing two holes in the wrong spot and having to spackle over them. My advice? Cut out pieces of wrapping paper the same size as your frames, tape them to the wall, and move those around until it looks right. It takes ten extra minutes and saves you a headache.
Measure the width of your wall, then subtract the total width of your frames and the gaps between them. Divide the leftover space by two, and that’s your side margin. I kept three inches between each frame and six inches between the top and bottom rows. That feels balanced without being cramped.
Set the sconces first. I hung them about five inches above the top row, centered over the left, middle, and right gaps between frames. That creates a triangle of light that hits each photo from above. Not gonna lie, the first time I turned them on, I just stood in the hallway and stared for a while.
Lighting matters more than you think
The sconces are what make this read as “custom designed” instead of “dorm room collage.” Warm bulbs make a huge difference. I tried one cool white bulb and it washed out the faces in the photos, making everything look flat and clinical. Swapped it for a soft warm LED and suddenly the whole wall felt like a little gallery nook.
There’s a really practical reason sconces work here too. They draw your eye upward and frame the photos with a gentle glow, which hides the fact that your frames are actually inexpensive and your prints are just standard matte paper from a photo lab. The lighting does the heavy lifting, so your budget doesn’t have to.
If you’re worried about wiring, don’t be. Many affordable sconces come in plug-in styles with a cord that you can hide along the baseboards or at the edge of the wall. Mine have a tiny switch right on the cord, which means I can turn them on without reaching behind the sconce. Small victory.
Choosing the right photos: portraits, animals, and candid shots
Here’s where the magic happens. The wall in the photo has a top row of candid-style shots: a group laughing, somebody mid-motion, a dog doing something goofy. The bottom row has more formal portraits, people looking at the camera, calm and direct. The mix gives the wall a story instead of just decoration.
You don’t need a fancy DSLR or a photographer friend for this. I took screenshots from old phone photos, ran them through a free black and white filter, and emailed them to a budget printing service. Twenty prints cost me less than five dollars. I still have fourteen extras sitting in a drawer, which honestly feels like a hoarder situation, but they were that cheap.
Pick photos that feel personal. That’s way more important than technical quality. My collection includes a shot of my grandparents at a barbecue, a picture of my cat mid-yawn, and a blurry selfie that became a favorite because of the angle. Nobody cares if the resolution is perfect from across the room. They only see the mood.
My real budget breakdown and one mistake I made
Ok so here is what this whole thing actually cost me. Six frames on sale: $54. Three sconces from a discount home store: $45. Printing: $4.80. Picture hooks and tape: I already had them. Total was just over a hundred, which is a bit more than “budget” maybe, but considering it transforms an entire wall, I think it’s a steal.
And the mistake? I hung the sconces too close together the first time. The light pools overlapped in a weird way, creating a hot spotlight in the middle and leaving the corners dark. I had to re-measure, patch three holes, and start over. My drill bit snapped halfway through the second attempt. That was a fun night.
Just remember to step back every few minutes while you’re hanging things. Look at it from across the room, not just up close. Squint a little. Move a frame two inches. It’s amazing how much difference a tiny shift makes, and it’s way cheaper than hiring someone to do it for you.
So there you go. A gallery wall that looks like it took planning and patience, but really just took a sale rack and a free afternoon. If you have a blank wall that needs a pulse, grab some black frames, pick your favorite photos, and make time for a little measuring. You won’t regret it.
Leave a Comment