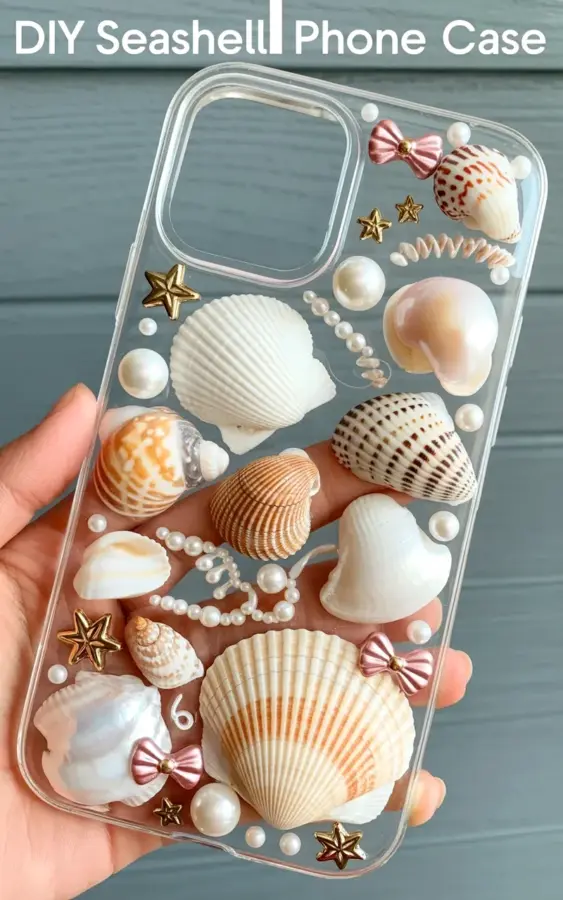
Honestly, this seashellphonecase has taken over my crafting table for the past two weeks. I’ve made it three times now, mostly because I kept messing it up, and I finally figured out where all the tutorials go wrong. If you love diyresinart but hate wasting supplies, this guide is for you. We’re going to build that clear case with real shells, pearls, and those tiny gold bows, but we’re doing it the smart way. No panic. No ruined batches. Just cozy beachycrafts you can actually use.
Here’s the thing: the photo everyone pins, with the scallop shells and delicate star studs against the gray wood, looks simple. It is not. The resin is unforgiving, and the shells have their own agenda. But with a few specific tricks, you can nail it on the first try.
Common Mistake #1: Using Shells Straight From the Beach
I get it. You collected a handful of perfect spirals on your last vacation and you want them in the case right now. Don’t do it. Beach shells are damp, salty, and full of microscopic grit, and that moisture will ruin your pour. I learned this the hard way when my first case turned cloudy and sticky in the corners.
You need to clean them properly. Soak your shells in warm, soapy water and scrub them gently with an old toothbrush. Let them dry completely for a day or two, then give them a quick wipe with rubbing alcohol. And here’s a weird one: compress them. Press the shell into your clear case lid first to make sure they sit flat. Round spiral shells love to roll around in the uncured resin, and that is a nightmare. If they rock, either pick flatter shells or be ready to glue them down with a dot of superglue before you pour.
Common Mistake #2: Pouring the Resin Too Thick
There’s a reason your project looks like a wavy, sticky mess. The resin is supposed to be a thin layer, just enough to cover the decorations, maybe 1 or 2 millimeters. When you dump in a thick layer to “make sure everything is coated,” it takes forever to cure. It heats up, it sinks, and your shells float or shift completely out of place.
The fix is easy. Pour a shallow base layer first, let it get tacky, then place your shells, pearls, and gold bows. After that, pour your top layer over it. It sounds backwards, but it gives you control. You want the case to be smooth and domed, not a thick slab of plastic. And honestly, if you’re rescuing a case that already has bubbles in the resin, you can sometimes poke them with a toothpick before it cures. Not always, but sometimes.
DIY Phone Case Resin Bubbles: The Silent Killer
Bubbles are the enemy of every diyresinart project, and they love hiding under the edges of scallop shells. You’ll think your case looks perfect, then three days later you spot a line of tiny air pockets that look like fog. Ugh.
Here’s how to fix it. After you pour your top layer, run a heat gun or a lighter *briefly* over the surface. The heat pops the surface bubbles. For deeper bubbles? That’s what the toothpick is for. You poke the bubble, pull it up, and it bursts. Do this in a well-ventilated area, and don’t be afraid to tilt the whole case. Let the resin flow into the gaps. Also, work slow. Resin that is mixed too vigorously has way more bubbles than resin that is folded gently with a silicone stick for like four minutes. Patience, okay?
Laying Out Your Seashell Phone Case Design Before You Commit
This is the part that separates the “pinterest perfect” cases from the hot messes. You cannot just toss shells in and hope the composition lands. You need a layout. I usually arrange my seashell phone case design on the outside of the empty case first, with no resin at all. I snap a photo of it. Then I look at the photo and ask myself what looks off.
Good design here, from the actual photo we’re referencing, uses variety. You have the big scallop shell as an anchor. A cluster of tiny spiral shells near the bottom. The pearls are the filler, they smooth out all the awkward empty zones. And the gold bows? They are the accent, the punctuation. Try to balance the colors. Use the smaller spirals to move the eye around the larger pieces. And leave some negative space. A case that is totally stuffed with treasure looks like clutter, not art.
Beachy Crafts Pearl Placement and Bow Strategy
Ok so, let’s talk about the pearls and the bows. You want them to look intentional. In the reference image, the pearls are scattered, but they are not random. They sit in the little valleys between the shells. If you just dump them everywhere, they roll together into an amber colored mess.
My advice? Place the largest shells first. Seriously. Get that big pink-bow companion settled near the top corner. Then, with wet fingers, start placing the pearls. Use the glue dot trick if you have to. The bows are fragile, so handle them with tweezers. Tuck them under the lip of a larger shell for a layered look. You don’t want everything to be flush and flat. The charm is in the tiny shadows.
Handmade Accessories Resin Safety (Yeah, We Need to Talk)
I know you want to get going, but this matters for handmade accessories resin safety. That stuff is toxic while wet. You need nitrile gloves, not latex (latex absorbs). You need a mask if your workspace is stuffy. And please, for the love of your lungs, do not pour it in your kitchen or right next to your bed. I use a table with a specific plastic mat, tucked away in a corner of the garage, with the door open. It’s annoying, but it also keeps my cat from stepping in it.
Another safety thing: clean up with rubbing alcohol, not soap and water. Resin is a plastic; it doesn’t wash down the drain properly. And remember, real seashells smell terrible when they heat up from curing resin. It’s a low tide kind of funk. I didn’t expect that. Just keep a window fan going and you’ll be fine. Don’t skip the gloves, seriously, resin burns are a real thing and they itch for days.
Final Details That Make Your Phone Case Look Expensive
Once the main pour is solid, usually after 24 hours, you are not done yet. When you make a diy seashell case, you need to check the edges. The resin will shrink just a tiny bit, and the edges can feel sharp or rough. That’s a sign you should sand them lightly with a fine-grit nail buffer. Just a few passes to soften the edge.
Here is a quick list of finishing touches that always work:
– Use a little bit of resin on a toothpick to fill any pinholes you missed near the pearls.
– Buff the whole front with a microfiber cloth to give it a glossy sheen.
– Check the camera cutout to make sure no resin dripped inside.
– Let it off-gas for a full week before you snap the case on. It stinks and the resin remains a little flexible for a few days.
Honestly, the camera cutout is the sneakiest spot. People always forget to mask it off from the back. If you get resin inside the frame, it blocks your flash. Then you gotta scrape it out with a craft knife, which is the worst feeling ever. Mask it before you start pouring.
Anyway, this craft is worth the effort. You’re not just making a case, you’re making a tiny little shadow box that holds a memory of the beach. And it’s genuinely fun to hold something you made, even with the flaws. Don’t chase perfection. Chase the feeling of picking up your phone and seeing your favorite seashell staring back at you.
So go collect your shells, double check your resin is fresh (old resin goes gloopy and never cures right, another reason to keep your jars sealed properly), and make the case. I’d love to know if this guide saved your first pour from total disaster. Message me a photo of yours when it’s done, especially if you caught a big bubble before it set. Happy crafting. 🐚
#seashellphonecase #diyresinart #beachycrafts #handmadeaccessories #cozyvibes
Leave a Comment