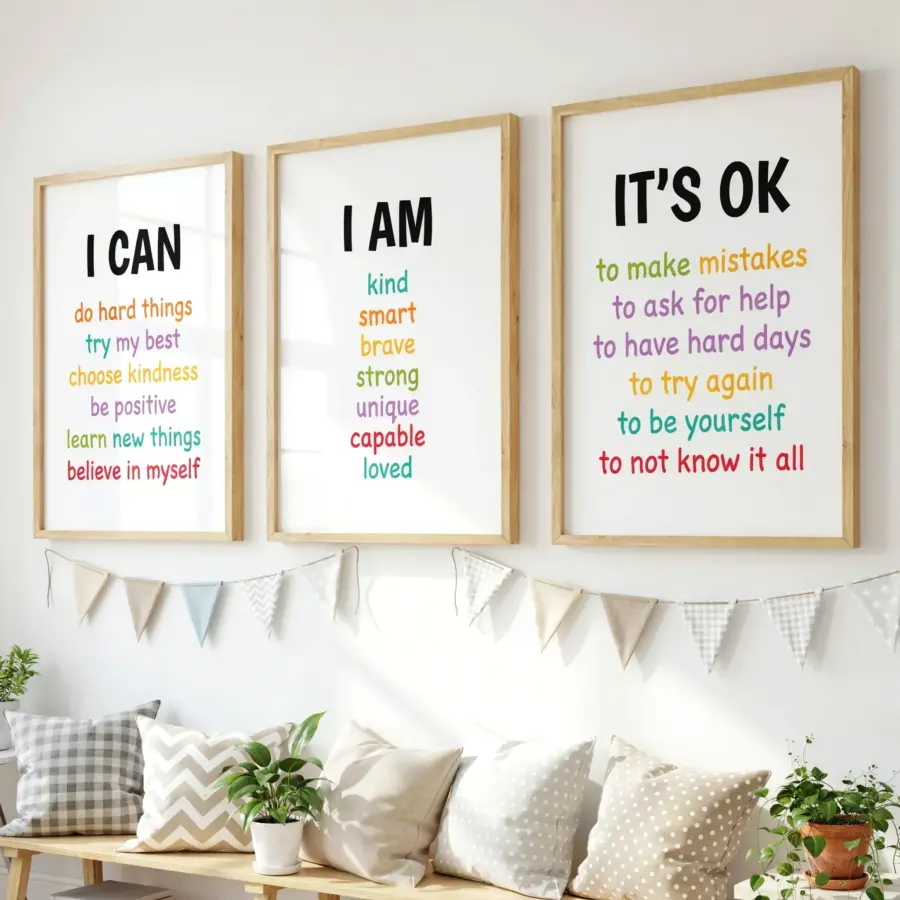
School supply lists are out, and the air smells like fresh markers and new backpacks. I’m already planning my kids’ homework nook, and yes, I bought a kids affirmation posters set of 3 before I even picked up a single notebook. These pastel positive affirmations make a small corner feel intentional without costing much. Honestly, a set of three is enough to fill a blank wall and give a child something meaningful to read every morning.
Pastel Colors Are the Secret to Getting Children to Actually Read the Words
Bright red and electric yellow might grab attention, but they also wear people out. Pastel pinks, mint greens, and soft butter yellows create a calm background that doesn’t compete with the message. I’ve noticed my kids stop and look at a poster longer when it’s pretty and gentle. It feels like a small conversation, not a shouting match.
Also, pastel colors work in almost any room. You don’t need to match a specific theme or buy new furniture. A soft blue poster hangs fine over a white desk, a gray wall, or even a polka-dot headboard. It’s forgiving, and that’s exactly what busy parents need.
What to Look for in a Printable Poster Set
Not all printable wall art is created equal. Some sets come with a single file size, and you end up stretching the image until it looks blurry. Others pack too many words into one design, so the affirmation gets lost.
Look for these things before you hit download:
- A high-resolution file that prints cleanly at 8×10 inches or 11×14 inches
- Large, readable font, not a skinny cursive script that’s hard to decode
- Affirmations that feel specific, like “I am brave” or “I make mistakes and learn from them”
- Simple lines and a little open space, so the design feels calm instead of busy
I also love when a set includes a bonus page with a matching quote or a smaller version. That’s not a dealbreaker, but it’s a nice surprise that makes the price feel even better.
Step-by-Step: Print, Frame, and Hang Your Affirmation Wall Art
First, decide where you want to print. Home printers work if the quality is decent, but a local print shop makes the colors look smoother. I usually upload the files to an office supply store’s website and pick them up an hour later. It costs about a dollar per page, which is nothing.
Second, cut the paper to size if your printer can’t do borderless printing. Use a paper trimmer or a sharp pair of scissors. Then slide the prints into simple wooden frames. I swear by the cheap ones from big box stores. They look surprisingly good when the art does the talking.
Third, hang them at eye level for the child, not for you. I once spent an hour trying to hang a poster with a level and still got it crooked, so I stopped obsessing. A tiny tilt makes it feel handmade, and honestly, a five-year-old won’t care. Use command strips to avoid putting holes in the wall. That way, you can rearrange the set when you inevitably switch the bedroom layout.
Where to Put Them So They Actually Get Seen
A poster buried behind a door or stuck in a dark corner won’t do its job. Place the three posters side by side above a desk, a dresser, or the head of the bed. The spot where a child ties their shoes or puts on socks in the morning is a great location. They’ll read the words without making a big event out of it.
In a classroom, hang them near the rug where kids gather for story time. That gives you a chance to point to a phrase during a conversation. The laundry room makes no sense, don’t do it. Keep the posters somewhere the kid spends calm time, not a hallway that just serves as a pass-through.
How to Keep the Posters Looking Good for the Whole School Year
Paper is easy to bend and tear, especially around little hands. Laminating the posters before you frame them is the most durable option. If that feels like too much work, slide them into clear menu holders or page protectors instead. That takes two minutes and keeps the paper safe from sticky fingers.
Another trick is to cut a piece of cardboard to fit the back of the frame, which stops the paper from sagging over time. I do this for everything printable now. It’s a tiny extra step, but it means the posters still look crisp in May. And if a poster gets ruined, you can always print another copy. That’s the beauty of buying a digital file instead of a heavy framed piece from a store.
More Than a Decoration: Simple Back to School Activities With the Posters
You can do more with these posters than just hang them up. In the morning, have your child pick one affirmation to say out loud. It takes ten seconds and sets a better tone than arguing about breakfast. I’ve caught my daughter whispering “I am kind” while she puts on her shoes, and that alone was worth the three dollars I spent.
For teachers, use the posters as a writing prompt during the first week of school. Ask each student to pick a phrase and draw a picture to go with it. Or use the posters during circle time to talk about feelings and how mistakes are normal. One quote can spark a whole conversation if you let it.
At home, pair the posters with a simple routine. Read all three affirmations together after brushing teeth. Honestly, it sounds silly at first, but kids love the repetition. It turns a cheap piece of wall art into a daily family habit.
So, if you’re piecing together a new school year and want something that won’t break the budget, this set of three is a good place to start. The pastel colors are easy on the eyes, the messages are genuinely helpful, and the whole project takes less than an afternoon. Grab a set, pick some frames, and put them up somewhere your kid will actually see. Save this for your kid’s room makeover, and maybe order two sets. One for the house, and one for a classroom that needs a little warmth.
Leave a Comment