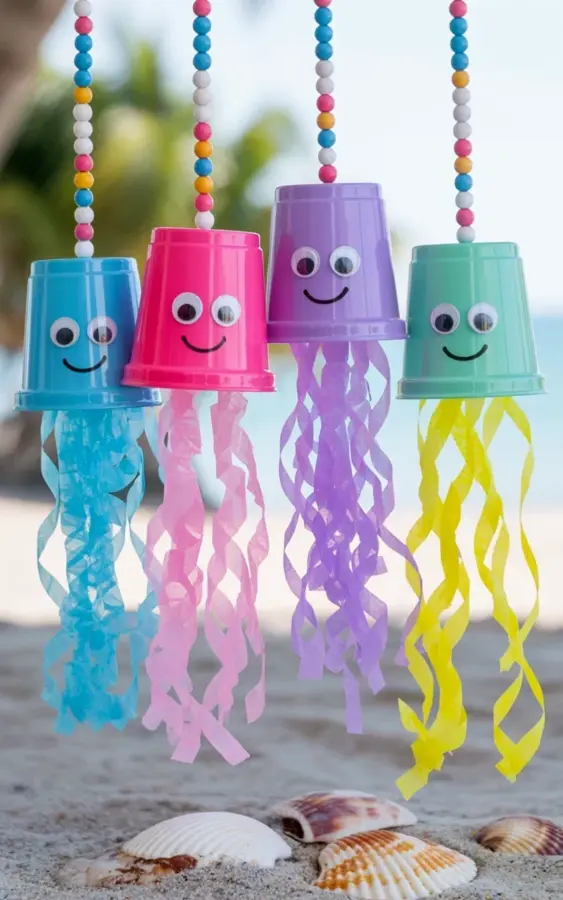
I spotted a photo of plastic cup jellyfish hanging on beaded strings against a real beach backdrop last summer and immediately knew I had to try this budget beach decor idea. The pastel cups in light blue, hot pink, lavender, and mint green had googly eyes and simple drawn smiles, with colorful tissue paper tentacles that looked like they were dancing in the wind. I grabbed a pack of cups and some tissue paper, and within an hour I had my own little jellies swaying on my porch. This Plastic Cup Jellyfish Craft is genuinely one of the easiest projects I have ever made, and it became an instant hit with my kids and my neighbors.
Why Plastic Cup Jellyfish Work for Ocean Themed Party Decor
If you are throwing an ocean themed party, you need decorations that are quick to make and easy on the wallet. These jellyfish fit both. The cups are cheap, the tissue paper costs a dollar or two, and you probably already have markers and string at home. I used mine for a beach birthday last July, and they held up beautifully even with a light breeze. The translucent tissue paper catches sunlight and creates a soft glow that reminds me of real jellyfish drifting through water. Plus, the cups stack for storage, so you can reuse them next year.
They also work well for a classroom underwater unit or a summer camp craft session. The colors in the photo light blue, hot pink, lavender, and mint green are playful without being overwhelming. You can mix them however you like. I personally love how the pink cup pops against the blurred blue ocean in the background.
Gathering Supplies for Your DIY Jellyfish Project
Before you start, collect everything you need. Here is what I used for my four jellyfish:
- 4 plastic cups in pastel colors (light blue, hot pink, lavender, mint green)
- Googly eyes (I used medium size, about 12mm)
- Permanent markers in black and a coordinating color for the smile
- Translucent tissue paper in blue, pink, purple, and yellow
- Scissors and glue dots or craft glue
- Beaded string or any thin cord for hanging
- A hole punch or a sharp skewer to make a hole in the cup bottom
You can find tissue paper packs at any dollar store. I bought a multi pack that had all four colors I needed. The beaded string came from an old garland I had lying around, but you can use ribbon or yarn. The whole project cost me under five dollars, which is why I call it my favorite budget beach decor idea.
Step by Step: How to Make the Tissue Paper Tentacles
The tentacles are what make these jellyfish look alive, so take a little extra time here. Start by cutting your tissue paper into strips about 1 inch wide and 12 inches long. You want the strips to be roughly the same length so the tentacles hang evenly. Then take each strip and gently twist it between your fingers, then curl it around a pencil or your finger to create waves. The photo shows curled and twisted strips that look wavy and flowing, not straight and flat.
I found that layering two or three colors per jellyfish gives a richer effect. For the light blue cup I used blue and purple tissue. For the hot pink cup I used pink and yellow. The translucent paper lets the colors show through, so even a few strips look full. Once you have a handful of curled strips, bunch them together and glue them to the inside rim of the cup. Press them firmly and let the glue set for a minute before you flip the cup over.
Adding Faces: Googly Eyes and Marker Smiles
After the tentacles are attached and dry, turn the cup right side up. This is the fun part. I glued two googly eyes onto each cup, placing them just below the rim so they peep out. Then I used a black permanent marker to draw a simple curved smile underneath. For the lavender cup I added a tiny tongue because my kids insisted, but the original photo just has a plain smile. You can also draw little cheeks or eyelashes if you want more personality.
Make sure the marker lines are clean and even. I practiced on a scrap piece of paper first because permanent marker does not wipe off plastic easily. If you mess up, you can rub a little hand sanitizer on the mark and it will come off, but it is easier to go slow. The googly eyes really bring the jellyfish to life, especially when they catch light and wiggle as the cup moves.
Hanging Your Jellyfish Against a Beach Backdrop
Once the faces are done, use a hole punch or a skewer to poke a small hole in the center of the cup bottom. Thread your beaded string through the hole and tie a knot on the inside so it does not slip out. The original photo shows the jellyfish hanging on colorful beaded strings against a blurred beach background. I hung mine from a wooden dowel on my front porch, and the afternoon sun made the tissue paper glow. If you are taking photos, position the jellyfish so they overlap slightly and the background is out of focus, just like in the picture.
For a real beach backdrop, you can use a printed photo backdrop or simply hang them near a window that faces a bright outdoor scene. The key is to have soft natural light behind them. I also tried hanging them from a tree branch in my backyard, and the breeze made the tentacles swirl. It looked exactly like the beach decor I had seen in the original pin.
Tips for Making This a Kids Craft Activity
My seven year old helped me make two of these jellyfish, and she loved it. Here are a few things I learned to keep the process smooth for little hands:
- Precut the tissue paper strips before the kids start. Cutting straight lines can be tricky for young children.
- Use glue dots instead of liquid glue. They hold quickly and do not make a mess.
- Let them choose their own cup color and tentacle colors. My daughter chose hot pink with yellow tissue, and it turned out cheerful.
- Draw the smile with a washable marker first, then go over it with permanent marker once they are happy with the shape.
- Supervise the hole punching step because the cup can slip.
The whole activity took us about 30 minutes from start to finish, and she was so proud to hang her jellyfish on the porch. It is a great screen free summer activity that also teaches fine motor skills through curling and gluing tissue paper.
Budget Friendly Summer Decor Ideas for Any Room
You do not need to live near the ocean to enjoy this summer decor idea. I hung my jellyfish in my living room above a white bookshelf, and they instantly made the space feel more relaxed. The pastel colors work well with neutral furniture. You can also string them across a window, over a bed, or along a fence for a backyard party. Because the materials are so affordable, you can make a whole school of jellyfish without worrying about the cost.
Another trick I tried was adding a small LED tea light inside the cup for a soft nightlight effect. The light shines through the tissue paper tentacles and looks magical. Just make sure the cup is stable and the light does not touch the paper. This turns your budget beach decor into a year round room accent. I keep mine out even after summer ends because they make me smile.
These plastic cup jellyfish are one of those rare crafts that look adorable, cost almost nothing, and come together fast. Whether you are decorating for a party, entertaining kids, or just wanting a little beachy vibe at home, this DIY project delivers. I hope you give it a try and snap a photo of your jellyfish against your own backyard backdrop. Pin this for when you need a quick, cheerful craft that actually works.
#BudgetBeachDecor #DIYJellyfish #KidsCraft #PlasticCupCraft #SummerDecor
Leave a Comment