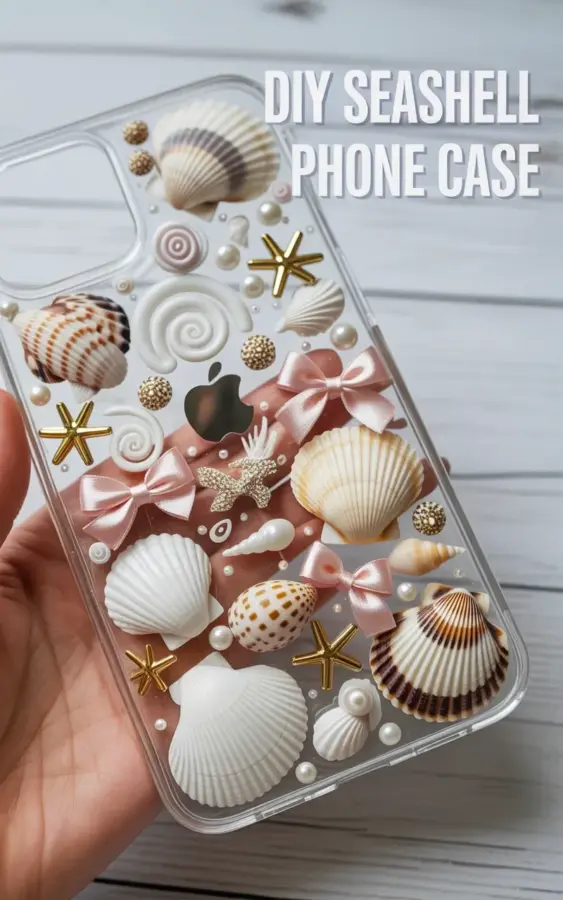
Honestly, I did not expect a plain clear phone case to turn into the prettiest thing I own. But here we are, staring at the finished seashellphonecase on my light gray wooden desk, and I keep picking it up just to look at the texture. The real scallop shells sit flush against the resin, surrounded by tiny pearl beads, gold star studs, and those little pink bows that somehow make the whole thing feel like a beach treasure you would find in a vintage shop. I documented the whole process so you can see exactly how this DIY resin project comes together, because the before and after is genuinely wild.
The case started out completely see-through, the kind you buy in a three pack for no reason. Now it has depth, layers, and a slightly tactile surface that makes it impossible to stop touching. And the best part? It was not difficult. It just took a bit of patience, some careful arranging, and a lot of waiting for resin to cure.
Before You Start, Get These Resin Materials Together
You will need a clear phone case that you do not care about ruining, because you are about to make it permanently artistic. I used a basic TPU case with raised edges, which honestly made the whole process easier since the resin had somewhere to pool. Beyond the case, here is what I gathered:
– Real seashells in different sizes, including scallop shells, small spiral shells, and one tiny shell that looks like a unicorn horn
– Pearls or pearl-like beads in white and cream tones
– Gold star studs, the kind used for nail art or scrapbooking
– Pink bows made from ribbon, plus a few small gold bows for contrast
– Two-part epoxy resin, about 50ml was enough for one case
– A mixing cup and stirring stick, plus gloves to protect your hands
That is the core list. You can absolutely swap out the pink bows for dried flowers or even tiny starfish, but for this seashell phone case DIY I stuck with the ocean theme.
How to Prep Your Shells and Arrange the Design Layer
Here is the step most people skip, and it honestly matters more than anything else in this DIY resin phone case project. Wash your shells in warm soapy water and let them dry completely. If they have any moisture trapped in the little crevices, the resin will not adhere properly and you will get weird white cloudy spots later. I dried mine on a paper towel for a full afternoon, and it was boring, but it made the final result look so much better.
Now for the fun part: mapping out your layout before anything gets sticky. Lay the clear case flat and drop your shells, pearls, and gold star studs into place. I started with the large scallop shell in the lower right corner as my anchor piece. Then I spiraled outward with the small shell pieces and filled gaps with the white pearls so the design felt balanced, but still intentionally scattered. The pink bows went near the top left, like the cherry on top of a very beachy sundae.
Move things around until it looks right to you. Snap a photo if you are worried you will forget the arrangement. This is your only chance to play without the pressure of the resin clock ticking.
The Right Way To Pour Resin Over the Phone Case Design
I mixed my epoxy resin exactly according to the instructions on the bottle. That is a critical detail. Too much hardener and the resin heats up and cures too fast. Too little and you are left with a sticky mess that never dries. Honestly, I did this once with resin that stayed tacky for a week and had to throw the whole thing away.
Pour the resin slowly over the shells and beads. Start from the center and let it push outward, because that helps the resin settle into all the little gaps instead of trapping air bubbles. I used a toothpick to nudge the shells that tried to float and to pop any bubbles I saw on the surface. A quick pass with a heat gun or even a lighter flame will also help release trapped air bubbles right after pouring.
The raised edges of the phone case keep the resin from spilling over the sides, but you should still tape around the outside if you are being careful. Clear packing tape works fine. Let the whole thing cure on a completely flat surface for a full 24 hours. I made the mistake of checking it after four hours once, and my finger print is permanently embedded in that failed attempt.
Finishing and Demolding Your Resin Art Phone Case
After 24 hours, the resin should be hard to the touch and not tacky at all. Gently peel the case away from your work surface or remove the tape if you added it. Some resin might have dripped over the edges, and that is normal. You can trim the overflow with a small pair of scissors or a craft knife once it is fully cured. Just go slow, because the resin is harder than you expect.
The back should feel smooth and glossy, and the shells should be clearly visible through the resin layer. If you notice any dull spots, you can buff them gently with a soft cloth. This is also the point where you can check your work from the inside of the case, the side that touches the phone. I love how the texture of the shells is visible from the front but the back stays comfortable against the phone.
The finished case has a bit of weight to it. Not heavy enough to be annoying, but enough to feel premium. The gold star studs catch the light when you move, and the pink bows add just the right amount of playfulness. It is somewhere between a statement accessory and a resin art project.
Why I Recommend Resin for This Beach Craft Project
Resin gives you that glass-like seal that no other adhesive or finish can replicate. Glue alone leaves bumps, and mod podge peels off eventually. This resin art approach locks the shells and pearls in place permanently, so the design is not going to shift around or lose pieces. The resin also adds a bit of depth to the case, which makes the shells look like they are floating in water.
This is a solid weekend craft, meaning you can do the prep day one and the finishing day two. I found it more rewarding than pressing flowers or making resin keychains, because you actually get to use the finished piece every single day. Every time I pull my phone out of my bag, I catch a little glimpse of the beach in my hand.
Quick Tips for a Cleaner DIY Resin Phone Case
Here are the exact notes I wish someone had given me before my first attempt at a resin phone case. Take these seriously and you will save yourself a headache:
– Work in a well ventilated area, but not anywhere dusty.
– Push the shells down firmly before the resin starts to set.
– Keep a toothpick nearby for floating pearls.
– Pop bubbles immediately. Do not wait, because once the resin thickens those bubbles are not going anywhere.
Honestly, the most important thing is to not overcrowd the design. Leave some empty space around the shells so the clear resin can show through. A busy case looks messy, but a balanced one looks intentional.
This Seashell Phone Case DIY Is Worth the Wait
The final result is a phone case that sparks actual joy every time I look at it. The scallop shells feel real, because they are real. The pearls look delicate without being fragile. And all those tiny details, the gold star studs and the pink bows, come together to create something that no store bought accessory could live up to. It is personal, a little quirky, and completely one of a kind.
If this inspired you to try a resin craft project, I say go for it. Save this post for your next beach craft session, gather your shells, and make something that actually looks like you. Your phone deserves a little treasure box decoration. Just give yourself enough time for the resin to cure and you will love the results.
Leave a Comment