The biggest mistake I made with my vertical herb garden (and how to fix it)
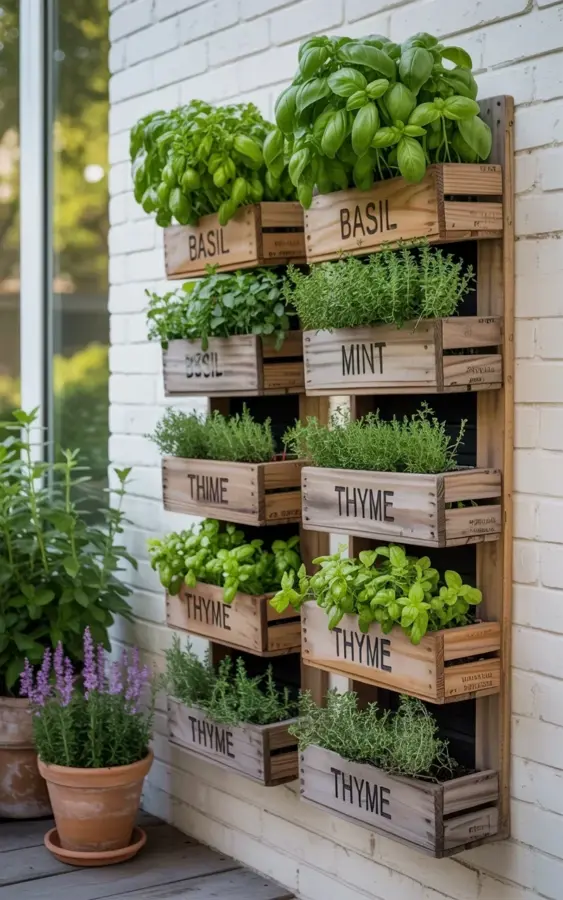
The biggest mistake I made with my vertical herb garden was thinking any old wooden crate would work against that white brick wall. Look, I was excited. I had this vision of lush basil, trailing mint, and tidy thyme bushes all lined up in neat rows. So I grabbed a mix of leftover wine boxes and flea market finds, screwed them to the wall, and planted. Within two weeks my basil looked sad, my mint was yellowing, and the thyme? It just gave up. The culprit was simple: no drainage holes, no spacing, and a total disregard for root rot. That photo up there, the one with weathered crates labeled BASIL, MINT, and THYME? That’s the after. Let me tell you how I got there without throwing in the trowel.
Why skipping drainage holes is a disaster for your herbs
Here’s the thing I learned the hard way: water has to go somewhere. In a vertical garden on a brick wall, gravity pulls moisture down into the lowest crate. If there’s no way out, it just sits there. Root rot sets in faster than you think. Seriously. My first setup had crates with solid bottoms. I watered once, and the soil stayed wet for a week. The basil roots turned brown and mushy. Not gonna lie, it smelled like a swamp.
So I drilled holes. Actually, I drilled a lot of holes. A grid of five or six ¼-inch holes per crate, spaced evenly across the bottom. That lets excess water drip out and evaporate against the brick. But here’s the weird personal detail: I tried using a regular drill bit and the wood split. Go with a paddle bit, it’s cleaner. Or use a spade bit. Whatever you do, don’t skip this step. Your mint will thank you.
The right crate spacing for basil, mint, and thyme
Spacing matters more than you’d think. In the photo you see two columns of six crates each, and each herb gets its own little apartment. But I initially crammed the crates too close together. The leaves from the mint crate overlapped the basil crate, blocking light. The thyme, which needs airflow, got all humid and started to mildew. A disaster.
I left about two inches of brick visible between each crate vertically, and the columns have a three-inch gap. Why? It lets air circulate behind the boxes. That white brick wall reflects light too, so the herbs get a little bounce lighting. Basil loves that. Mint doesn’t care. But thyme? Thyme is a diva about airflow. Give each crate breathing room. Honestly, just leave a hand-width between them if you’re eyeballing it.
One more thing: I used identical crate sizes for all six spots. That way the spacing stays uniform and the water distribution from top to bottom is predictable. Mixing deep and shallow crates makes the watering schedule a nightmare. Keep it uniform. Trust me on this.
How to pick a liner that actually works (and one that doesn’t)
Ok, so you drilled holes. Great. But bare wood against moist soil? That’s a recipe for mold and rot on the crate itself. You need a liner. My first attempt: I used old landscape fabric. It fell apart in three weeks. Then I tried plastic sheeting. The water pooled on top of it because I didn’t poke holes in the plastic too. Facepalm.
What finally worked: heavy-duty pond liner. I cut a rectangle that fits inside each crate, folded up the sides, and used a staple gun to attach it to the inside of the wooden frame. Then I poked holes through the liner and the crate bottom simultaneously. That way the water drains through the liner and the wood. The liner keeps the wood dry, the holes let the water out. Win-win.
- Don’t use: thin weed barrier, garbage bags, or old shower curtains (I tried a shower curtain liner once – it smelled like a public pool).
- Do use: pond liner, thick vinyl, or even heavy-duty contractor bags folded double.
- Pro tip: staple the liner only at the top edges, not all around. You want it to be removable if you need to repot.
Have you ever tried to remove root-rot soil from a narrow crate? It’s a mess. A removable liner makes cleanup ten times easier. And please, cut the liner flush with the crate top so it doesn’t show. The whole point of weathered wood on a white brick wall is that rustic look. A plastic edge sticking out ruins it.
Matching crate sizes saved my sanity (and my plants)
I mentioned this briefly, but it deserves its own heading because I messed it up so badly. My original setup had a deep crate for basil, a skinny one for mint, and a shallow tray for thyme. The watering was a nightmare. The deep crate held too much moisture, the shallow one dried out in hours. I was watering three different schedules, and honestly, I just gave up and watered everything the same. Bad idea.
Now I use identical crates: all 6x6x6 inches inside. That’s the sweet spot for shallow-rooted herbs like basil, mint, and thyme. The basil gets a little crowded after a month, but that’s fine. Mint actually likes being root-bound. Thyme prefers drier conditions, but with the same crate depth I just water it less. The uniformity means I can water the whole vertical garden in one pass, top to bottom, and adjust per crate only when the soil feels dry.
And here’s a random aside: I labeled each crate with a wood-burning tool. The photo shows “BASIL” and “MINT” and “THYME” on separate crates, but I actually have a few EXTRA crates for oregano and chives. I burned the names right into the wood. Looks gorgeous against the brick. Way better than a sharpie.
Rotating your watering schedule is a game changer
You might think watering a vertical garden is straightforward: give each crate the same amount. Nope. The top crates dry out faster because they get more air and light. The middle crates stay damp longer. The bottom crate collects runoff from above. So if you water them all equally, the bottom one gets waterlogged and the top one gets crispy. Not good.
What I do now: I water from the top down, but I go lighter on the top two crates (just enough to moisten the top inch of soil) and heavier on the middle two. The bottom crate gets almost nothing because it catches drips. Around day three I check by feel: stick my finger into each crate. The basil crate at the top often needs water first. The thyme in a middle crate can go five days. Mint is a hog – it drinks faster than anything else. So I actually rotate which crate I give extra water to based on the plant, not the position.
This is a seasonal thing too. In summer, the whole wall gets more light, and the brick heats up, drying the soil faster. Winter, with lower sun angle, the wall is cooler and the soil stays damp. I adjust my schedule every time the season shifts. Right now in late spring, I’m watering every other day. Come July it might be daily. Pay attention. Your herbs will tell you if you look.
Why a white brick wall is the perfect backdrop for herbs
Let’s talk about that white brick. It’s not just pretty. The white reflects light back onto the plants, especially the lower leaves that might be shaded by the crate above. That’s huge for basil, which gets leggy if it doesn’t get enough light. My first wall was a dark brown brick. The herbs looked okay, but the lower leaves always yellowed. White brick doubled the usable light. Plus the contrast makes the green pop like crazy. That photo with the lush basil and delicate mint? The white brick is half the reason it looks so good.
If you don’t have a white brick wall, you can fake it. A coat of whitewash or a white painted brick panel works. Or just hang a white wooden board behind the crates. But honestly, if you already have white brick, you’re golden. Just make sure the crates are securely mounted. Brick is porous and crumbly. Use masonry anchors, not just screws into the mortar. I learned that when a crate fell off at 3 AM. Woke up the whole house. My mint survived, barely.
Anyway, the combination of weathered wood, bright white, and green herbs is timeless. It works in a farmhouse kitchen, a modern apartment balcony, even a covered patio. And it’s easy to maintain once you fix the mistakes I made.
Final thoughts on fixing your vertical herb garden
So that’s my story. The biggest mistake I made was rushing into a vertical herb garden without thinking about drainage, spacing, and watering habits. But the fix is simple: drill holes, use a real liner, keep crates uniform, and rotate your watering schedule seasonally. Honestly, now my basil is thriving, the mint is taking over (as mint does), and the thyme is bushy and fragrant. That white brick wall I kept ignoring? It’s now my favorite feature in the kitchen. If you have a similar setup or are thinking of building one, start with these lessons. Skip the trial and error. Your herbs will be lush, and you’ll actually enjoy watering instead of dreading it. Give it a shot – and tag me when you do. I want to see that green against white.
Leave a Comment